
This project was the first one I documented on the website: a present for a very good friend of mine. I had missed his birthday in the flurry of exams, and I wanted to make it up to him with a nice gift. We had a brief chat, I considered a few other projects, but this one jumped out to both of us. He said he wanted a scarf for his upcoming trip to Japan (after our shared trip to Vietnam and Cambodia), so I thought this would be nice, and practical. He also said that he wanted it to be very much a gift from me, and didn't want to dictate the style too much. However, he did indicate that he liked "brutalist" architecture, and also that he thought pockets would be cool.
I ran a search for the architecture in question. I found this image:
I really liked this for 2 main reasons. Firstly, it was shaped like a rectangle, and thus a scarf. Secondly, it was one of the first results to come up in a search for "brutalist" architecture, and therefore there was at least a chance he would be familiar with the building. I sketched a few designs, but then selected this one.
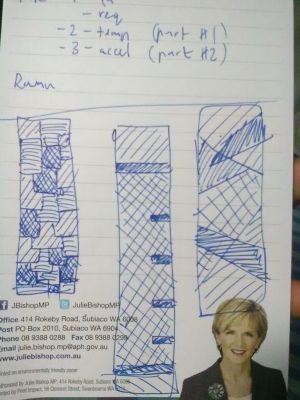
Three different shades of gray (brutal and raw) would be used in the design, as indicated by the hatching. The design is symmetrical through the horizontal axis, but not the vertical. Pockets will probably added on both ends, but I'm not sure how large they will be yet. If they were too large, they may be impractical and annoying. Perhaps just one "secret" pocket will be added for money etc. This might be useful for travel.
I have elected to use a knit stitch called "Mistake Rib Stitch". I liked the name, I had never knitted with it before, it looked easy, and it was described as "a Rib Stitch that doesn't stretch as much", which sounded perfect for a scarf. I have experience with knitting, and am able to knit, purl, cast on and off, and increase and decrease. I have a small amount of experience with cable stitch too, but it is a little challenging for me.
Next actions:
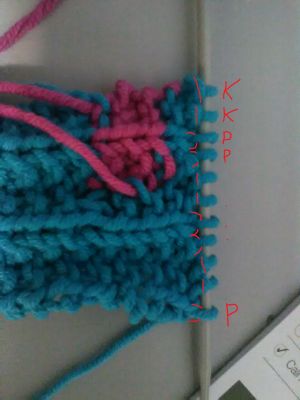
I made some progress today, by practicing knitting, purling, casting on, and changing colours between rows. I cast on 11 (4n+3) stitches, and knitted around 20-30 rows (K2P2...P1), changing colours to blue. In order to make the scarf, I will also need to learn how to change colours during a row. Finally, I still need to learn how to cast off, and also pick up dropped stitches, as highlighted during the risk analysis.
Next actions:
I continued practicing, by changing colours during a row, and watched a video about picking up dropped stitches. I think that the key here is to know what type of stitch you dropped, and then pick it up in the correct orientation.
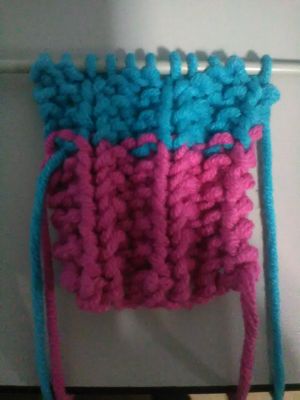
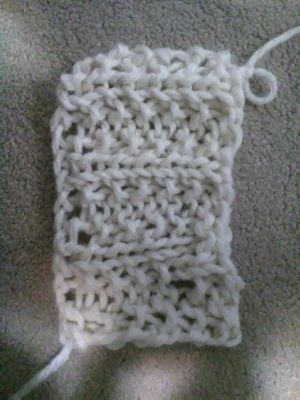
Then I cast off. I saw something in a Youtube video about casting off using the pattern you were knitting with, but I don't know if there's any point to that. It would be useful to be able to cast on in a more aesthetically pleasing way though. Below is the picture of the finished practice piece:

Now I need to choose wool and needle size. Too big, and the scarf will be poorly defined and detail will be impossible. Too small, and I'll be knitting forever. However, in order to reduce the economic and environmental cost, 12 mm needles from a previous project will be used. Additionally, wool from a previous project may also be used, as it is the correct colour (gray) and size (10 mm needles, approximately 12). I appear to have roughly 120 m of yarn left. Based on a tension of 12 stitches / 10 cm (10 sts/10 cm given on packet, rounded up for worst case), and an average men's scarf size of 6" x 70" (approx 15 cm x 178 cm), an online calculator gives the required yarn length of 169 m. Therefore, allowance for 200m of wool should be made. I drew a rough design below, which shows an aesthetically pleasing ratio of 1:5 for line:gap thickness.

Tension calculations will have to be done before producing an actual pattern though, therefore all wool needs to be bought before progressing any further. Based on rough calculations using relative image area, some lengths of wool can be calculated:
| Wool colour | Required length (m) |
|---|---|
| Light gray | 18 |
| Medium gray | 149 |
| Dark gray | 34 |
Next actions:
Today I went to the shops and bought the required wool. I now have:
| Wool colour | Owned length (m) |
|---|---|
| Off white | 85 |
| Medium gray | 210 |
| Dark gray | 75 |
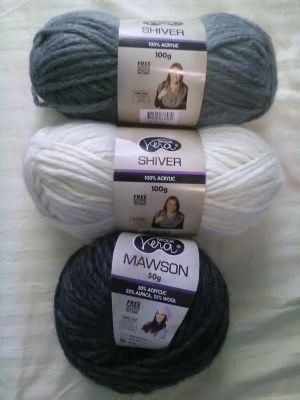
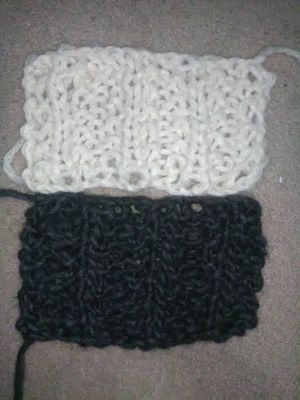
This should provide plenty of spare yarn. The total cost was approximately $15, which comes under budget. Where possible, the wool type was matched, but this was not possible given the very limited colour selection of bulky yarn. At least the main yarns used, the off-white and medium gray, are of the same type. The balls are pictured below:
Since I have two different kinds of wool, I will need to do 2 test swatches, one for each wool variety.
Next actions:
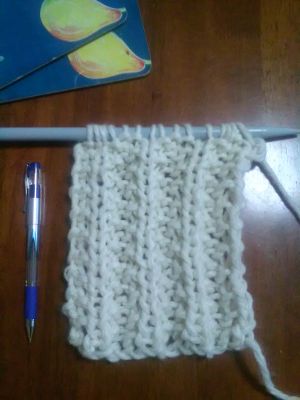
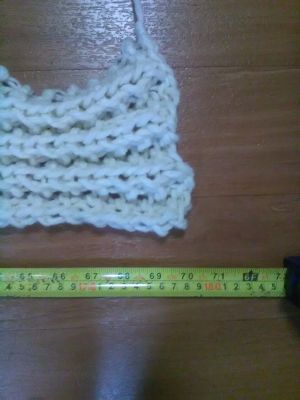
Knitted a test swatch with the white/light gray yarn, 15 stitches by around 12 rows. The tension ended up being correct for the rows (12 rows/10 cm), but Mistake Rib Stitch seems to have widened the average stitch to lower the column tension. Long story short, 15 stitches seems correct for width, and 21 rows will probably make a square.
I ended up making a mistake. It's actually a fairly hard pattern to follow sometimes, I don't know how I picked up that extra stitch though. Better not knit the real thing when I'm tired.
Next actions:
Knitted the second test swatch with the other brand of yarn, cast on 15 stitches, some number of rows. The tension looks virtually identical to the other wool, and measures within 10%. Therefore, I will use the wools together without making any adjustment. This wool is a little more coarse, but might provide and interesting variation.
So, now the draft pattern which I will use to make this:
Cast on 15 sts.
Mistake rib stitch for 21 rows.
Dark bands are 6 stitches by 4 rows.
Medium gray sections are 21 rows.
Repeat pattern as shown.
Let's hope this is enough!
I timed a few rows of 15 stitches, and including small errors, I was averaging around 1:30 per row. So, at around 214 rows, it should take around 5 - 6 hours. But there will be time for bigger mistakes, and changing wools etc, and therefore 7 hours might be more realistic. Perhaps 8.
Next actions:
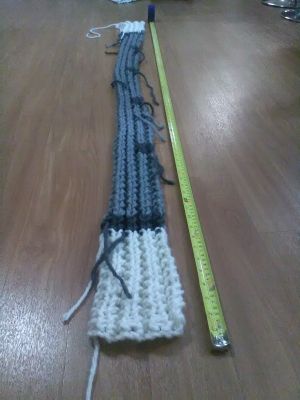
Finished knitting the scarf. Pictures included. Took around 6 hours, roughly as expected.
After I knit the first few rows, I started to get into the groove. The large needles and bulky yarn really increased the speed. After a little while, the pattern also became largely second nature.
When the scarf was finally complete, there was a little needlework to do to sew the ends in. It ended up taking around 30 minutes.
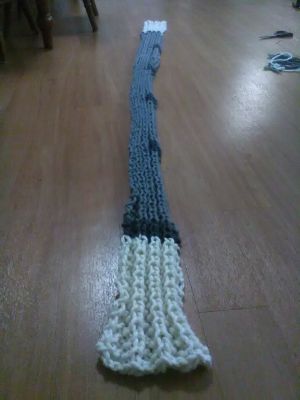
The finished scarf was very satisfying to look at and hold. It felt extremely warm. It was slightly too flexible, and I think this can largely be attributed to the needle size. At least it will mould nicely around my friend's neck.
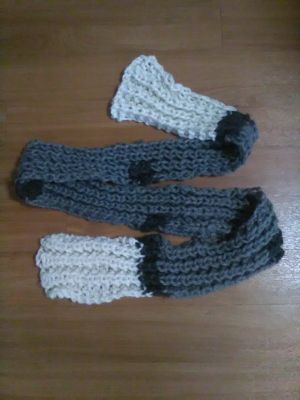
As per usual, it pays to stay on schedule. I ended up staying up late the night before an international flight to get this done in time. Then I carried it in my backpack, waterproofed by plastic bags, for around 3 weeks until it got cold enough to give to my friend. I think that in future, I will try to allocate days rather than hours in which to do knitting, and keep a TV on in the background. Also best kept to rainy days to avoid overheating and FOMO. I ended up making a few mistakes, I think these are unavoidable in more complex patterns. My friend really liked the present, which was really nice. I hope it's keeping him warm in Japan, or if he's reading this in the cold.
2 out of 3 of the project objectives were achieved. The only objective not achieved was a low priority, optional objective. Stakeholders were satisfied, cost was maintained at less than $20, the quality was high, waste was recycled, risks were effectively managed, and time constraints were met (if only just).